Showing posts with label Gifts. Show all posts

Sunday, July 14, 2013

July Goals Finished


I did it! I finished them the weekend before the wedding. I still can't believe I did it, especially since it was my first time hand-quilting! It feels good to follow through with a plan, even with a little one in the house... it can be done! 
(Thank goodness for naps and Daddy-time!).


 Easter. 
My favorite part is the tone-on-tone white crosses. 


 Christmas.
My favorite part is the singing Santa (Dear Mr. Claus from Moda).


Fourth of July.
My favorite part is the wonky star of course - first time ever sewing one of those!


St. Patrick's Day.
My favorite part is the reverse applique (I found some helpful hints here and here).

Thank you Melissa and Shanna for hosting "A Lovely Year of Finishes;" it definitely helps to have a little extra motivation!


My Button

I also have loved the Summer Series at Clover & Violet - so many fun project ideas for when you are on the go and you can't bring the sewing machine with you! I've linked up two of these table runners with them (the Christmas one and the St. Patrick's Day one)... go check out what everyone else has hand-crafted!


Also linking up with...

Fresh Poppy Design

--------------------------------------

Friday, July 12, 2013

I'm Almost Done! (July Goals)


Yup, that's right! I have a week until my friend's big day and all I have to do is finish the binding on all four table runners/toppers. I can do it!!

I finished the quilting quicker than I expected - it went much faster once I found the right combination of needle to fabric :) I still need to work on getting my stitches to look as nice on the back as on the front, but that did improve once I got rid of the hoop - but once I did that, the table runner got a little poofier. More practice needed I guess! I did like that I could quickly pick it up during Peanut's cat naps without taking the risk of waking her up by turning on the sewing machine.

Now to hand stitch the binding to the back - maybe I can finish a side before Peanut wakes up again!

*Edit from phone: Sure enough, after just finishing one side, I heard some one wake up! She's lucky she's cute :)


To see the entire story on my July goals, see this post...


My Button

Monday, July 1, 2013

July Goal!

My Button


Finally, I feel like I can join "A Lovely Year of Finishes" with Melissa and Shanna! I have four table runners/toppers that I started in June, but I really need to finish them by July 20 (or maybe a few days afterwards!). 


My usual wedding present for friends/family is a patchwork Christmas Tree Skirt - the pictures above show a few that I've made, including the one I made for myself (it's so fun to see the skirts in use!). This tradition started because it has always been Mom's go-to-gift. Plus, most of my friends don't have a lot of holiday decorations to start their new life with, so a tree skirt helps them get started in that department!

Well, the friend who is getting married on this month knows how to sew (I helped re-introduce her to this amazing hobby last year), and I think she would have more fun making her own tree skirt. Thus, she gets table toppers/runners instead (still holiday inspired, of course!).


I pulled fabric and I started planning. You can see my scratchings above. Grizz's engineering paper is perfect for quilt planning - it's just glorified graph paper, but it makes me feel official :) The plans originally included embroidered borders, but having never embroidered words before, I decided that trying one new thing (hand-quilting) was enough for this project's deadline!

I kept my fabric choices limited to my stash. Other than the Christmas Fabric (Dear Mr. Claus by Moda), all fabrics are either JoAnns or thrift store purchases. Thankfully I kept some holiday fabrics when I sent most of my stash home with my parents when they visited after Peanut was born. Why did I send fabric home? We have tentative plans of moving back to SD this fall!! Whoop whoop! 

Anyways, enough chatter... the details:

St. Patrick's Day.
Reverse Applique (first time skill!).
Hand Quilted with Embroidery Floss.
Left to do? Binding.

Easter/Spring.
Easy Patchwork.
Hand-quilting started with DMC Floss.
Overcame some early cutting/measuring difficulties.
Left to do? Finish quilting and attach binding.

Fourth Of July
Wonky Star (first time try!).
Left to do? Take out the safety pins and re-baste it... I experimented and tried to pin-baste it without taping down the back fabric - yikes! Since then, Grizz has bought me more masking tape and I can try again! I'm still deciding if I want to hand-quilt this one or machine quilt it... I also need to cut the scrappy binding and attach it!

Christmas.
Neighbor (Bride-to-Be) loved this fabric, so I cut into my fat-quarter bundle just for her :)
Machine-Appliqued the Santa and gift tags.
Left to Do? Baste, Quilt (Embroidery Floss) and Bind.


So, I have a lot left to do, but I have three weeks of nap time and daddy-time-with-Peanut to do it! Wish me luck :)


Also linking up with Fabric Tuesday and WIP Wednesday...

Fresh Poppy Design

WIP Wednesday at Freshly Pieced

Sunday, June 9, 2013

Car Seat Strap Holders Tutorial

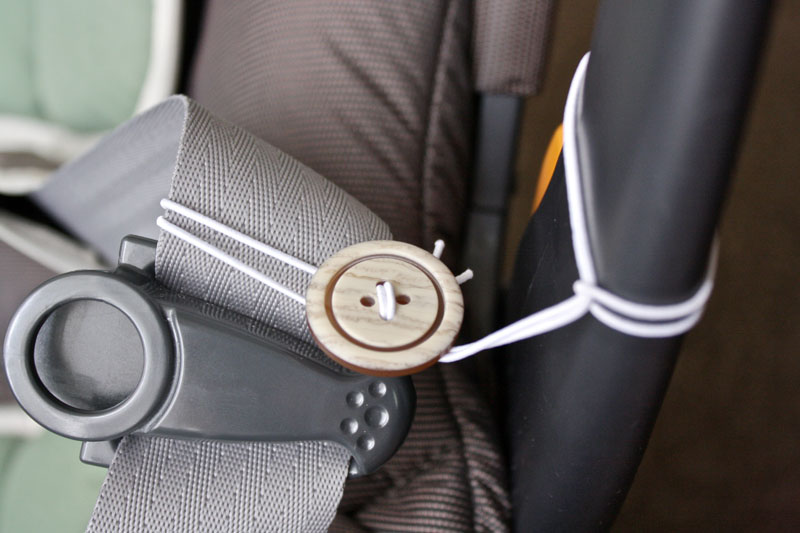
Last weekend, we were lucky enough to take a trip to SoCal to visit my brother's family. Since they have a 3 year old and a 1 year old, they pretty much had all the baby gear we needed - we didn't have to check any bags, carseats or strollers while flying! Anyways, while using their old carseat, we noticed a stretchy, buttony contraption on each side. After asking Sister-In-Law about them, she explained that they are used to hold the straps... what a great idea!! We had just been trying to place the straps to the side while placing Peanut in the seat, but we would still have to dig for the straps underneath her - this sometimes lead to a disgruntled Peanut. With these contraptions, the straps are held out to the side, making strapping Peanut it much more enjoyable!

See the difference? The contraption holds the strap to the side, instead of letting the strap just sit there in the way of a baby.

So, without further ado, here's a small tutorial so you can make them for yourself or as a great baby shower gift! Please realize that different car seats might need different lengths of cording and different lengths between knots... if you have a car seat, make sure you guess and check a little to make sure it fits!

You will need an elastic cording - I used the "beading cord elastic," but I'm sure the "round cord elastic" would work just as well. I was in a rush in Walmart when I picked these up, so I grabbed both just in case :)

You will also need two buttons. I used to have my collection in a large canning jar, but I sent that home in a craft tub... we're slowly trying to relocate our stuff 14 hours from here in preparation of moving home! Someday, I'll be able to put my collection back in the jar; until then, a baggie will just have to work.

 Pick out two good-sized buttons. Here is the size of mine compared to a $5 bill.

 Cut a 24" length of the elastic cording and fold it in half.

 Place the folded end through through one of the holes in the button - from the back to the front.

 Then, place it back through another hole - from the front to the back - and pull a good length though (this is when guess and check works really well!).

 Knot the end! (Again, guess and check!)

This is when I thought I was done. Then, I had an idea. Buttons and babies don't always go over well - choking hazards and all. So, I created another step...

Place a knot between the button and the folded end. Then, if Baby somehow gets the contraption off the car seat handle, at least there's a knot on both ends and the button can't fall off... it may not be a perfect fix, but it's enough for me. I really don't see it being a problem, but it's an easy step toward being a tad bit more safe :)

Don't forget to follow the same steps to make the second one! You need two of these holders!

 Now for the fun part! Loop the folded end around the handle and pull the button through...

 ... then, loop the knotted end around the strap and hook it on the button.

 Place the second one around the other side of the car seat handle, and you are ready to place Baby down without having to dig under him/her for the straps. Yay!


Linking up with Sew Much Ado at We Did It! Wednesday...


Friday, July 13, 2012

Christmas in July: Sing with me?

I needed another cool weather reminder... it's another hot day in the apartment!


 I found these pieces of Christmas music a few months ago, I think. I knew right off the bat that they would not be staying in their pristine condition :)

~Santa Claus is Coming To Town and White Christmas were found for 50% off at an antique store.
~The Beginner's Carol book was found at a flea-market-thing for very little as well

 I fell in love with the front cover of this sheet music!

 And isn't that just the perfect picture for a White Christmas?

 The piano book has the cutest illustrations, too!

 So sweet!


Since these were purchased for a low price, I didn't feel one bit bad about ripping them up and using mod-podge to adhere them to some canvas. Here's a sneak peak!

I want to add some rub-on words before showing you all of my creations! I'm thinking they'll be perfect for gifts or for hanging on our own walls :)

Wednesday, July 11, 2012

WIPs: The Last Week or Sew :)

So, here you go folks. I'm just loving all my free time during this summer. As you'll see, I'm in the middle of quite a few projects, but thankfully, I've had a few finishes along the way! We leave to visit family in a week and a half, so I need to keep chugging along on my "to-sew-list" since I won't be bringing any sewing projects with (except for maybe some hexies for the car ride!).

I finished binding this quilt last Saturday - I couldn't wait to finally finish it, so it even came along on two short camping trips with us :) You can see a full view of this top here, but I'm waiting to get a fun quilt-in-nature picture to show you the whole entire completed thing!

This basket of joy is done and ready for a certain baby to arrive. You'll get to see all of it once the gift is given!

I finished two skirts for Simple Simon & Co's Skirting the Issue Project (more info here!)...

Simple Simon and Co


... but I've pulled enough fabric for three more! They are so quick and easy to sew up and  I just love the finished product!

 I've also pulled fabric for Hopeful Thread's July Project - Little Boys Shorts Sewing - I've promised her 3 - 3T shorts, so obviously I won't use all of these fabrics... which ones do you think I should use? (The top one has airplanes on it, and the 2nd-to-the-top is actually a blue plaid, but all you can see is the wrong side - oops!)

I'm over half way done with the binding on my Giant Vintage Star quilt - soon and very soon, I'll have another quilt finish!

I told you that I had cut these vintage sheet remnants into squares... well, here is the quilt top! Baby patchwork quilts are such a quick finish!! That blue stuff on the left is what I'm planning for the backing. Now, I just need to quilt and bind!

 I've had these Christmas squares cut for awhile, and it was time to sew them up. I can't tell you anything more! (Secrets secrets!)

Same thing here!

 And finally, for some non-sewing news... I had fun on Sunday playing with some vintage sheet music, mod podge and canvas. This is only one example of the five that I worked on. There's still a few more steps I want to take before I have some fun, Christmas wall hangings for myself or to use as gifts... once they're all prettied up, I'll show you the final product! Sometimes it's fun to get all crafty on something that doesn't involve the sewing machine :)

But now, I must go clean (and sew!). Grizz has some relatives coming tomorrow!


Linking up here:
  WIP Wednesday at Freshly Pieced