Showing posts with label Crafts. Show all posts

Sunday, June 9, 2013

Car Seat Strap Holders Tutorial

Last weekend, we were lucky enough to take a trip to SoCal to visit my brother's family. Since they have a 3 year old and a 1 year old, they pretty much had all the baby gear we needed - we didn't have to check any bags, carseats or strollers while flying! Anyways, while using their old carseat, we noticed a stretchy, buttony contraption on each side. After asking Sister-In-Law about them, she explained that they are used to hold the straps... what a great idea!! We had just been trying to place the straps to the side while placing Peanut in the seat, but we would still have to dig for the straps underneath her - this sometimes lead to a disgruntled Peanut. With these contraptions, the straps are held out to the side, making strapping Peanut it much more enjoyable!

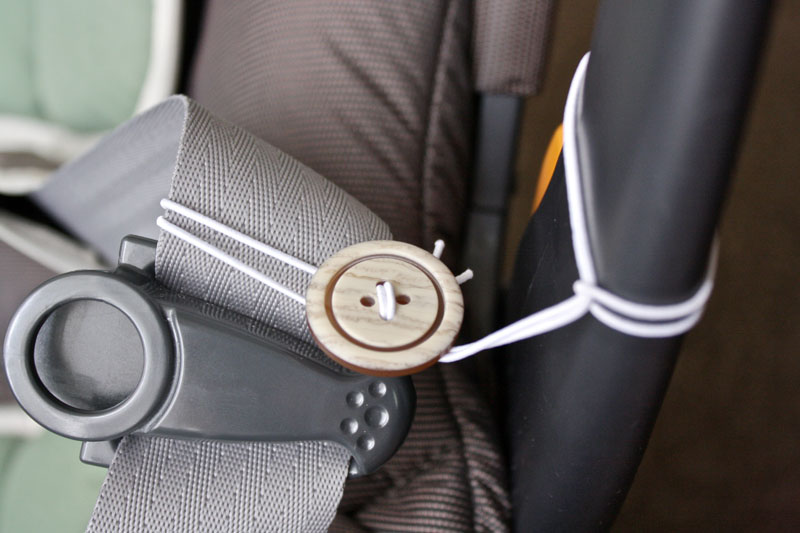
See the difference? The contraption holds the strap to the side, instead of letting the strap just sit there in the way of a baby.

So, without further ado, here's a small tutorial so you can make them for yourself or as a great baby shower gift! Please realize that different car seats might need different lengths of cording and different lengths between knots... if you have a car seat, make sure you guess and check a little to make sure it fits!

You will need an elastic cording - I used the "beading cord elastic," but I'm sure the "round cord elastic" would work just as well. I was in a rush in Walmart when I picked these up, so I grabbed both just in case :)

You will also need two buttons. I used to have my collection in a large canning jar, but I sent that home in a craft tub... we're slowly trying to relocate our stuff 14 hours from here in preparation of moving home! Someday, I'll be able to put my collection back in the jar; until then, a baggie will just have to work.

 Pick out two good-sized buttons. Here is the size of mine compared to a $5 bill.

 Cut a 24" length of the elastic cording and fold it in half.

 Place the folded end through through one of the holes in the button - from the back to the front.

 Then, place it back through another hole - from the front to the back - and pull a good length though (this is when guess and check works really well!).

 Knot the end! (Again, guess and check!)

This is when I thought I was done. Then, I had an idea. Buttons and babies don't always go over well - choking hazards and all. So, I created another step...

Place a knot between the button and the folded end. Then, if Baby somehow gets the contraption off the car seat handle, at least there's a knot on both ends and the button can't fall off... it may not be a perfect fix, but it's enough for me. I really don't see it being a problem, but it's an easy step toward being a tad bit more safe :)

Don't forget to follow the same steps to make the second one! You need two of these holders!

 Now for the fun part! Loop the folded end around the handle and pull the button through...

 ... then, loop the knotted end around the strap and hook it on the button.

 Place the second one around the other side of the car seat handle, and you are ready to place Baby down without having to dig under him/her for the straps. Yay!


Linking up with Sew Much Ado at We Did It! Wednesday...


Thursday, May 16, 2013

Finally, a Semi-Crafty Post!

Just a little glimpse of some clothing projects I did while waiting for the Peanut to arrive...


I dyed some onesies (some I bought, some I received at a shower) red and blue. Then I created the designs using both PhotoShop and a word document and printed them out on normal printer paper. After tracing them onto freezer paper (placing the printed page underneath and tracing with a permanent marker), I cut out the freezer paper designs with a regular scissors and an exacto-knife. Then, following a tutorial from Dana, I ironed the freezer paper onto the onesies and painted them white!

You can see the fermata on the red onesie and the math joke on the blue one. I also have a few more - another math joke, plus a mountain climbing on for Grizz, and a Montana one to honor the state she was born in. The "Cutie Pi" was made with only paint, but the others are a combination of painted designs with iron-on letters for the words. When I do this project again, I will do my best to only use paint - the letters look like they're starting to fall off from stretching the onesies so much while getting them over Peanut's head.

The bottom onesie is one that was created at a baby shower. The hostess had a lot of onesies, burp rags and bibs to be decorated with paint and stencils. I made the cow one :) I decided to switch it up and paint the outline instead of just the inside of the cow. It was such a fun project at the shower!

**The "Acute Baby" onesie was worn to the shower thrown by a few math teachers I subbed for often :)

Sunday, February 10, 2013

Instagrams...

... going all the way back to this past November! Yikes!


 Christmas Joy... hand-painted on old barnwood.

 Lefse! A Scandinavian tradition.

 Twilight :) Grizz is always nice enough to come with me.

 A Thanksgiving Prime Rib. The tape is on the oven to remind us "NOT TO OPEN IT."

 Fluff mail. So, yes, the plan as of now is to try out some cloth diapers. I'll let you know how it goes ;)

 Ultrasound flowers. Grizz is great.

 More Christmas projects. Still working on my painted handwriting.

 Some random breakfast.

 Spritz. Spritz. Spritz. Christmas COOKIES! Geez, I'm starting to crave sugary goodness...

 Alma Mater men's basketball team traveled to Big Sky Country. We gladly wore our blue and gold to support them.

 The crib is up!!

 More goodness from the Alma Mater. Family and friends know just exactly what Scooter needs to wear once he/she arrives!

 A snowy day from a third floor math classroom.

 Scooter's quilt top...

 Scooter's quilt top quilted.

 A January walk.

 A Birthday Snow (maybe three or four days after the nice walk in the previous picture).

En Route to Yellowstone.

And finally... today's project while watching Downton Abby on Netflix. Scooter has a new hat! (Removable flower depending on which gender Scooter surprises us with).

Monday, December 10, 2012

Some Christmas Joy

I don't know exactly how I feel about my first go at making collages over at PicMonkey. I love PicMonkey and I love how easy it is to arrange the photos into a collage (and thus less arranging while typing the blog post!). We'll see if I continue to use them :)

Anyways, here's a little sampling of the Christmas decor of the apartment... I've always loved decorating for Christmas! Even in college, I made sure that the dorm rooms and the houses I lived in were decorated! Thus, I've always lugged around a few totes of Christmas decorations. Thankfully, Grizz doesn't mind! 

Dala Horse Ornament Music Ornament Button Wreath
The Dala Horse is my first try at making felt ornaments. I have a bit of Swedish in me, so I couldn't resist buying the pattern from Lova Handmade on Etsy! The button wreaths and the music balls were made last year, and the vintage ornaments were found this past summer at a garage sale - I couldn't pass them up!

Scrabble Oraments
I made the scrabble ornaments this past fall, and they will all be going out as gifts. It will be hard to see them go, but I hope the new owners will love them as much as I loved making them!

Joy Faith Love Baby

 Last but not least, at the top of the collage you'll see some painted barnwood signs that I created a few weeks ago (I pretty much took over the living room floor for several days as I painted and repainted until I was satisfied). They are the official greeters outside on our porch. And to top it all off, our tree has a fun garland this year :) We had our ultrasound last week, and Scooter is definitely the best addition to the tree for his or her "first" Christmas!


Wednesday, July 11, 2012

WIPs: The Last Week or Sew :)

So, here you go folks. I'm just loving all my free time during this summer. As you'll see, I'm in the middle of quite a few projects, but thankfully, I've had a few finishes along the way! We leave to visit family in a week and a half, so I need to keep chugging along on my "to-sew-list" since I won't be bringing any sewing projects with (except for maybe some hexies for the car ride!).

I finished binding this quilt last Saturday - I couldn't wait to finally finish it, so it even came along on two short camping trips with us :) You can see a full view of this top here, but I'm waiting to get a fun quilt-in-nature picture to show you the whole entire completed thing!

This basket of joy is done and ready for a certain baby to arrive. You'll get to see all of it once the gift is given!

I finished two skirts for Simple Simon & Co's Skirting the Issue Project (more info here!)...

Simple Simon and Co


... but I've pulled enough fabric for three more! They are so quick and easy to sew up and  I just love the finished product!

 I've also pulled fabric for Hopeful Thread's July Project - Little Boys Shorts Sewing - I've promised her 3 - 3T shorts, so obviously I won't use all of these fabrics... which ones do you think I should use? (The top one has airplanes on it, and the 2nd-to-the-top is actually a blue plaid, but all you can see is the wrong side - oops!)

I'm over half way done with the binding on my Giant Vintage Star quilt - soon and very soon, I'll have another quilt finish!

I told you that I had cut these vintage sheet remnants into squares... well, here is the quilt top! Baby patchwork quilts are such a quick finish!! That blue stuff on the left is what I'm planning for the backing. Now, I just need to quilt and bind!

 I've had these Christmas squares cut for awhile, and it was time to sew them up. I can't tell you anything more! (Secrets secrets!)

Same thing here!

 And finally, for some non-sewing news... I had fun on Sunday playing with some vintage sheet music, mod podge and canvas. This is only one example of the five that I worked on. There's still a few more steps I want to take before I have some fun, Christmas wall hangings for myself or to use as gifts... once they're all prettied up, I'll show you the final product! Sometimes it's fun to get all crafty on something that doesn't involve the sewing machine :)

But now, I must go clean (and sew!). Grizz has some relatives coming tomorrow!


Linking up here:
  WIP Wednesday at Freshly Pieced