Welcome to my first official tutorial :) This project had very little planning. Grizz and I have wanted to stop using so many plastic bags, and we even have a few reusable totes laying around... but they're not pretty! They are the plain-Jane blue ones that you can pick up for a dollar at any major store. I found some fabric at JoAnn's specificially designed for these sorts of projects on clearance for $2 a yard - so I picked up 2 yards :) The next day, I sat down and got to work! So, enjoy the numerous pictures and hopefully the instructions will help you become more environmentally friendly!
Cut three pieces from your fabric: the body is 38" x 20" and the straps are 3.5" x 29" (you'll need two!)
First, pin the straps in half right sides together and sew a line on the open side with a 1/4" seam allowance (do not sew either end!_ Remember to backstitch when you start and end.
Now for the fun part - turn the strap around. This takes some work...
Keep going!
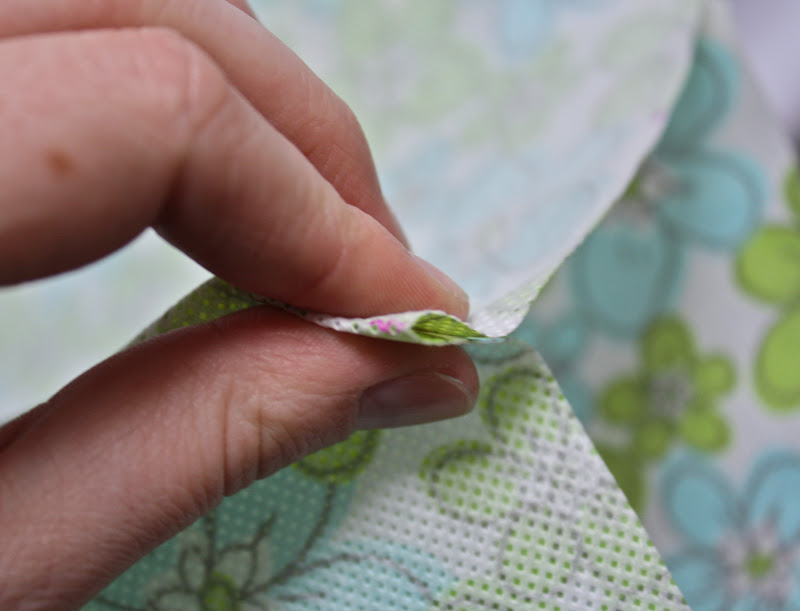
When you finally get the strap turned right side out, finger press. I like to pin this down so that the seam stays on the edge and doesn't slide around while topstitching.
Topstitch - I did it 1/4" from the edge that has the seam...
... and on the other side (then no one can tell which side has the seam!)
Optional: sew two more seams 1/4" from each of your topstitch lines... this makes it look just a bit more professional.
Now: do it again with the other strap :)
With your fabric for the main body of the bag, fold it in half (hamburger style!) and pin the side edges together (right sides together).
DO NOT pin 6 inches from the fold.
Get out a ruler and align it with the edge near your fold.
Put the 6" mark on the fold.
I used an invisible ink marker to mark BOTH SIDES 3" from the fold...
... and 6" from the fold.
This step gets a little tricky: Pick up your bag and pinch each side at the 3" mark...
See?
The fabric between those 3" marks needs to be folded INSIDE the bag...
There's the extra fabric! The extra fabric should align with the original 6" mark that we put on the fabric. Pin that down and sew a 1/2" seam allowance along the side edge.
My fingers show the length of where the extra fabric is inside the bag. I wanted to add some strength to this part, so I used my triple straight stitch to stitch over it again... if you want, you could just use a regular stitch to go over it again too.
I'm pretty sure this fabric will not unravel, but I felt like zig-zagging the seam allowance anyways.
Here is a view of my first bag I made - see how the strap is sewn on with an outline and an "x"? Well, it overlaps my top hem (I did a 1.5" hem on my first bag).
I didn't like how all the stitches are overlapping and messy, so I decided on my second bag to do a 2" hem. Because this fabric won't unravel and because it folds so easily - I decided just to fold it over once (without an iron! Yay!). To do this, I marked 4" from the top of the bag around the entire bag.
And then I folded the top down to the 4" mark - making a 2" hem!
I used a 3-point zig-zag around the hem. You could just do a straight stitch, a normal zig-zag or pull out one of those fun stitches on your machine!


With my bag laying flat, I marked 7" and 12" from the side seam...
...folded the ends of one of the straps 1" from the end...
... and placed these on the inside of the bag (above your hem line)... The arrows are pointed to your 7" and 12" marks (place the strap outside these marks).
Make sure your strap isn't twisted! The side that is facing toward you on one end should still be facing you on the other end.
I used my triple-stitch again to sew on the straps - you can just use a straight stitch! Just make sure it's put on well - you don't want this to break when you're carrying home eggs and such :) Don't forget to attach your second strap on the other side...
One final step: I topstitched along the top of the bag - 1/4" away from the top.
You're done!
Now enjoy being an environmentally friendly shopper - with a fabulous tote :)
***Remember that this is my first full tutorial. I welcome questions!!


Good for you for saving the planet and helping others to do so! I have loads of strong plastic bags from the supermarket and a few fabric bags but I have plans to make a whole load of fabric ones and ditch the plastic altogether. Fabric is incredibly expensive over here and we have no version of Jo-anns so I've been collecting used duvet covers and pillow cases for the purpose!
ReplyDeleteCongrats on your first tutorial, Heidi. It's detailed and easy to follow!!! A fabulous, environmentally friendly tote...
ReplyDelete